열여덟번째 날: Perl로 아두이노(Arduino) 가지고 놀기
저자
@ja3ck(a.k.a. chammse) - Python과 Ruby를 지나 Perl에 정착. 백수를 향한 힘찬 발걸음을 내딛는 중.
시작하며
저는 어려서부터 레고나 과학상자류를 가지고 노는 것을 좋아했습니다. 다 자란 지금도 무언가 만드는 것을 좋아합니다. (하지만 현실은 행거도 제대로 설치 못해서 30분 동안 낑낑)
소프트웨어를 전공하게 된 당시에도 하드웨어를 제어하는 일에 흥미를 가지고 있었습니다.
그러다보니 임베디드를 다루는 회사를 다니며 다양한 경험을 쌓게 되었고,
아두이노를 접하게 되었죠.
하지만 그동안 여가를 즐기기에는 너무나 더럽게 바쁜 SI에 매달려 있었습니다.
구입해 놓고 오랫동안 잠재웠던 아두이노가 불쌍해보여 다시 한 번 꺼내들어 봅니다.
준비물
필요한 모듈과 장비는 다음과 같습니다.
- Win32::SerialPort
- Linux/Mac 환경에서는 Device::SerialPort를 이용합니다.
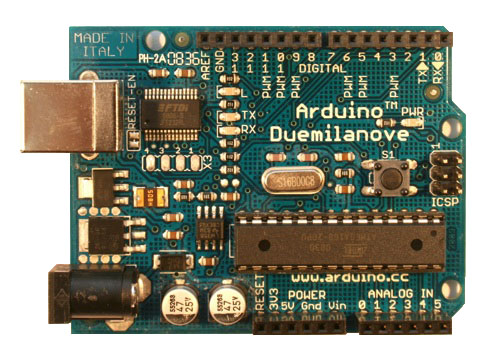
- 아두이노 (저는 Duemilnove를 쓰고 있습니다.)
아두이노?

아두이노(Arduino)는 AVR을 기반으로하는 오픈소스를 피지컬 컴퓨팅 플랫폼입니다. 이를 구동하는데 필요한 모든 것은 오픈소스를 기반으로 합니다. 게다가, 제공되는 통합 IDE 환경을 통해 초보자도 손쉽게 장비를 조작하여 데이터를 획득할 수 있습니다. 아두이노에 대한 자세한 사항은 다음 사이트를 참고하세요. 그리고 지르는 겁니다!
- Arduino.cc
- 아두이노스토리 (네이버카페)
아두이노에서 시리얼 통신준비
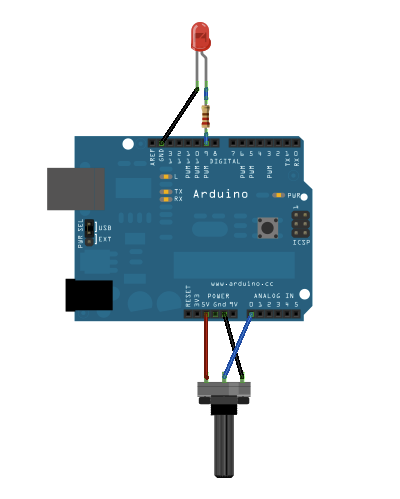
우선 간단하게 다음과 같이 회로를 구성하여 봅시다.
아두이노 회로 구성 준비물
- Potentiometer
- 220 옴짜리 저항 1개
- LED 1개
- 패치 케이블 5개
- 빵판(Bread Board)
- 마지막으로, 아두이노

아두이노의 소스 코드는 다음과 같습니다. (참고소스)
1 2 3 4 5 6 7 8 9 10 11 12 13 14 15 16 17 18 19 20 21 22 23 24 25 26 27 28 | const int analogInPin = A0; // 아날로그 입력에 0번 핀 설정const int analogOutPin = 9; // 아날로그 출력에 9번핀 설정int sensorValue = 0; // 센서(Potentiometer) 수신값int outputValue = 0; // PWM으로 내보낼 센서값void setup() { // Serial 포트를 9600bps로 시작 Serial.begin(9600);}void loop() { // 아날로그 값을 읽는다 sensorValue = analogRead(analogInPin); // 읽은 아날로그값을 매핑한다. outputValue = map(sensorValue, 0, 1023, 0, 255); // 아날로그 값을 출력한다. analogWrite(analogOutPin, outputValue); // 결과를 시리얼포트를 통해 전송 Serial.print("sensor=" ); Serial.print(sensorValue); Serial.print("\t output="); Serial.println(outputValue); // 10 밀리세컨드 동안 대기 delay(10);} |
Perl에서 시리얼포트에 접근하기
Perl에서 시리얼 포트에 접근하는 것은 정말 쉽습니다. 몇 가지 기본적인 통신 설정만 해주면 끝이죠. 자, 그럼 이제 Perl을 통해 아두이노가 걸어오는 말을 들어볼까요?
1 2 3 4 5 6 7 8 9 10 11 12 13 14 15 16 17 18 19 20 21 22 23 24 25 26 | use strict;use warnings;use Win32::SerialPort qw( :STAT 0.19 );# 제 PC 에서는 아두이노가 'COM4' 으로 연결되어 있습니다my $serial_port = Win32::SerialPort->new('COM4') or die "Can't open COM port: $^E";# Serial port 설정들 입니다$serial_port->handshake('none');$serial_port->baudrate(9600);$serial_port->parity('none');$serial_port->databits(8);$serial_port->stopbits(1);$serial_port->read_interval(0);$serial_port->read_const_time(10);$serial_port->write_char_time(1);$serial_port->write_const_time(100);$serial_port->write_settings() or die "Can't change Device_Control_Block: $^E";$serial_port->save('my_serial.cfg');while (1) { if (my $line = $serial_port->input) { chomp $line; print $line, "\n"; }} |
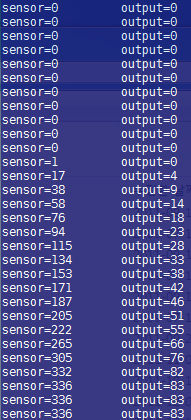
다음과 같이 나오면 성공입니다.

이걸로 무엇을 할까?
연결해서 데이터를 받아오긴 했지만 이걸로 대채 뭘 할 수 있을까요. 구구절절 기사에 다 설명하진 못하겠지만 사운드 볼륨을 조절하거나, 조광센서를 달아서 자리를 비웠을 때 누군가 책상 위에 손을 대면 경고 화면을 출력한다거나, 온도, 습도, 먼지감지 등의 센서를 달아서 사무환경 개선을 해달라고 팀장님을 협박할 수도 있겠습니다.
Nunchuck 연결
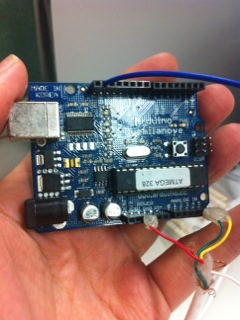
오늘은 아두이노가 보내주는 정보를 가지고 재미난 놀이를 해봅시다. 닌텐도 게임기 Wii의 조작 컨트롤러인 Nunchuck에 연결해볼까요? 우선 Nunchuck의 입력 단자를 과감하게 잘라 다음과 같이 연결합니다. (자르지 않고 커넥터를 구매하는 방법도 있습니다.)

- 하얀색(white) => GND
- 좌빨색(red) => 5V
- 녹색(Green) => Analog 4번
- 노란색(Yellow) => Analog 5번
그리고 아두이노에서 Nunchuck에 접근하기 위해 아두이노 Playground에 있는 라이브러리를 이용합니다.
그런데 최근 Arduino 1.0으로 업데이트되면서 Wire 라이브러리 호출 방법에 약간의 변화가 생겼는데, 다음과 같이 수정합니다.
Wire.send(0xF0)처럼 되어 있는 부분을Wire.write(byte(0xF0))로 변경합니다.Wire.receive()를Wire.read()로 변경합니다.
수정한 WiiChuckClass를 이용해 Perl 측에 보내줄 소스는 다음과 같습니다.
1 2 3 4 5 6 7 8 9 10 11 12 13 14 15 16 17 18 19 20 21 22 23 24 25 26 27 28 29 30 31 32 33 34 35 36 37 38 39 40 41 42 43 44 45 46 47 | #include <math.h>#include "Wire.h"#define MAXANGLE 90#define MINANGLE -90WiiChuck chuck = WiiChuck();int angleStart, currentAngle;int tillerStart = 0;double angle;void setup() { Serial.begin(115200); chuck.begin(); chuck.update();}void loop() { delay(20); chuck.update(); Serial.print(chuck.readRoll()); Serial.print(":"); Serial.print(chuck.readPitch()); Serial.print(":"); Serial.print((int)chuck.readAccelX()); Serial.print(":"); Serial.print((int)chuck.readAccelY()); Serial.print(":"); Serial.print((int)chuck.readAccelZ()); Serial.print(":"); Serial.print((int)chuck.readJoyX()); Serial.print(":"); Serial.print((int)chuck.readJoyY()); Serial.print(":"); if(chuck.zPressed()) Serial.print("T"); else Serial.print("F"); Serial.print(":"); if(chuck.cPressed()) Serial.print("T"); else Serial.print("F"); Serial.println();} |
이렇게 Nunchuck의 조작 값을 받아 어디에 이용할까요? 오늘은 Wii Nunchuck을 마우스로 사용해봅시다.
이를 위해 Win32::GuiTest의 마우스 조작 기능인 SendMouse를 이용해 보도록하겠습니다.
1 2 3 4 5 6 7 8 9 10 11 12 13 14 15 16 17 18 19 20 21 22 23 24 25 26 27 28 29 30 31 32 33 34 35 36 37 38 39 40 41 42 43 44 45 46 47 48 49 50 51 52 53 54 55 56 57 58 59 60 61 62 63 64 | use strict;use warnings;use Win32::SerialPort qw( :STAT 0.19 );use Win32::GuiTest qw( :ALL );my $serial_port = Win32::SerialPort->new('COM4') or die "Can't open serial port : $^E";$serial_port->handshake('none');$serial_port->baudrate(115200);$serial_port->parity('none');$serial_port->databits(8);$serial_port->stopbits(1);$serial_port->read_interval(0);$serial_port->read_const_time(20);$serial_port->write_char_time(1);$serial_port->write_const_time(100);$serial_port->buffers(4096, 4096);$serial_port->write_settings or die "Can't change Device_Control_Block: $^E";$serial_port->save('my_serial.cfg');# nuncuck 의 조이스틱 값my $prev_joy_x;my $prev_joy_y;$serial_port->are_match("\n");while (1) { if (my $line = $serial_port->lookfor) { chomp $line; print $line, "\n"; # nuchuck 으로 부터 수신하는 값은 이렇게 다양합니다. 그러나 우리는 조이스틱의 x,y 값과 두개의 버튼값만을 이용합니다. my ($roll, $pitch, $accel_x, $accel_y, $accel_z, $joy_x, $joy_y, $button_z, $button_c) = split ':', $line; # 두개의 버튼을 동시에 누르면 프로그램을 종료합니다. if ($button_c eq "T" && $button_z eq "T") { print "EXIT\n"; $serial_port->close; exit 0; } # 조이스틱 X 값 처리 if ($joy_x) { if ($prev_joy_x ne $joy_x) { SendMouse "{REL$joy_x,0}"; $prev_joy_x = $joy_x; } } # 조이스틱 Y 값 처리 if ($joy_y) { if($prev_joy_y ne $joy_y) { $joy_y = $joy_y > 0 ? -$joy_y : abs($joy_y); SendMouse "{REL0,$joy_y}"; $prev_joy_y = $joy_y; } } # 버튼을 눌렀을때 마우스 클릭 처리 if ($button_z eq "T") { SendMouse "{LEFTCLICK}"; } }} |
자, 그럼 시연하는 모습을 볼까요? 이로써, 사장님 자세로 여유롭게 의자에 기대서 웹서핑을 즐길 수 있게 되었습니다!
정리하며
- Win32::SerialPort로 아두이노가 보내는 데이터를 수신합니다.
- Win32::GuiTest로 마우스를 제어합니다.
- 어른은 혼자 노는 겁니다.
- 'Flask 짜응 하악'하던 블로그에 불쑥 나타나 Dancer라는 십계를 내린 am0c군에게 감사의 뜻을 전하며 무지한 제게 많은 가르침을 주시는 aero님께도 감사의 말씀을 전해드리고 싶습니다.
Articles by Seoul Perl Mongers
Illustrated by Hyunsu Park, Designed by Hojung Youn, Edited by Hojung Youn & Keedi Kim

 2011 Seoul.pm 펄 크리스마스 달력 Seoul.pm Perl Advent Calendar 2011
 거침없이 배우는 펄