스물한번째 날: Perl on Heroku with MySQL
저자
@keedi - Seoul.pm 리더, Perl덕후, 거침없이 배우는 펄의 공동 역자, keedi.k at gmail.com
시작하며
Heroku는 시작된 클라우드 PaaS(Platform-as-a-Service) 중 하나입니다. 지난 기사인 스무번째 날: Perl on Heroku에서는 Perl과 Mojolicious 기반의 웹 응용을 Heroku에서 사용하는 법을 알아보았습니다. 대부분의 웹 응용은 보통 저장 공간으로 RDBMS든 NoSQL이든 데이터베이스를 사용하죠. Heroku에 올린 웹 응용 역시 다를 바가 없습니다. Heroku는 공식적으로 PostgreSQL을 지원하지만, MySQL 역시 써드파티 업체인 ClearDB를 통해 지원합니다. Heroku의 무료 플랜 기준으로 Perl / Mojolicious 기반의 웹 응용으로 MySQL을 사용하는 방법을 살펴보죠.
준비물
필요한 모듈은 다음과 같습니다.
직접 CPAN을 이용해서 설치한다면 다음 명령을 이용해서 모듈을 설치합니다.
$ sudo cpan \
    DBD::mysql \
    DBIx::Lite \
    Mojolicious
사용자 계정으로 모듈을 설치하는 방법을 정확하게 알고 있거나 perlbrew를 이용해서 자신만의 Perl을 사용하고 있다면 다음 명령을 이용해서 모듈을 설치합니다.
$ cpan \
    DBD::mysql \
    DBIx::Lite \
    Mojolicious
ClearDB 설정
지난 기사인 스무번째 날: Perl on Heroku에서 생성한 마지막 상태의 인스턴스와 저장소를 기준으로 진행합니다. Heroku는 데이터베이스를 비롯해 여러 컴포넌트를 Heroku Add-on이라는 개념으로 제공합니다. MySQL은 ClearDB MySQL Add-on으로 제공하는 것이죠. Heroku 인스턴스에 이런 애드-온을 추가해서 필요한 기능을 블럭처럼 쌓는 셈입니다. 이제 우리의 인스턴스에 MySQL 애드-온을 추가합니다.
$ cd ~/workspace/heroku/keedi-seoulpm
$ heroku addons
No add-ons for app keedi-seoulpm.
$ heroku addons:create cleardb:ignite
Creating cleardb:ignite on ⬢ keedi-seoulpm... free
Created cleardb-globular-38972 as CLEARDB_DATABASE_URL
Use heroku addons:docs cleardb to view documentation
$
$ heroku addons

Add-on                            Plan    Price  State
────────────────────────────────  ──────  ─────  ───────
cleardb (cleardb-globular-38972)  ignite  free   created
 └─ as CLEARDB_DATABASE

The table above shows add-ons and the attachments to the current app (keedi-seoulpm) or other apps.

$
애드-온 추가는 addons:create 명령을 이용합니다.
이 후 따라오는 인자인 cleardb:ignite의 경우 :으로 항목을 구분할 수 있는데,
cleardb의 경우 애드-온의 이름이며, ignite는 해당 애드-온에서 제공하는 무료 플랜의 이름입니다.
즉, 애드-온은 일종의 서비스이며, 이런 서비스는 Heroku가 직접 제공하기도 하고 써드파티를가 제공하기도 합니다.
플랜은 해당 서비스에서 제공하는 여러가지 요금제로 보통 무료부터 시작해서 구간 별 종량제로 요금이 나뉘며,
이름 자체는 제공하는 서비스마다 조금씩 다릅니다.
ClearDB MySQL 애드-온과 Heroku Postgres 애드-온의 요금 정책은 다음과 같습니다.
$ heroku addons:plans cleardb
         slug            name    price
───────  ──────────────  ──────  ────────────
default  cleardb:ignite  Ignite  free
         cleardb:punch   Punch   $9.99/month
         cleardb:drift   Drift   $49.99/month
         cleardb:scream  Scream  $99.99/month
$ heroku addons:plans heroku-postgresql
         slug                           name         price
───────  ─────────────────────────────  ───────────  ───────────
default  heroku-postgresql:hobby-dev    Hobby Dev    free
         heroku-postgresql:hobby-basic  Hobby Basic  $9/month
         heroku-postgresql:standard-0   Standard 0   $50/month
         heroku-postgresql:premium-0    Premium 0    $200/month
         heroku-postgresql:standard-2   Standard 2   $200/month
         heroku-postgresql:private-0    Private 0    $300/month
         heroku-postgresql:premium-2    Premium 2    $350/month
         heroku-postgresql:private-2    Private 2    $600/month
         heroku-postgresql:standard-4   Standard 4   $750/month
         heroku-postgresql:premium-4    Premium 4    $1200/month
         heroku-postgresql:private-4    Private 4    $1500/month
         heroku-postgresql:standard-6   Standard 6   $2000/month
         heroku-postgresql:premium-6    Premium 6    $3500/month
         heroku-postgresql:standard-7   Standard 7   $3500/month
         heroku-postgresql:private-6    Private 6    $3600/month
         heroku-postgresql:premium-7    Premium 7    $6000/month
         heroku-postgresql:private-7    Private 7    $7000/month
더 해당 애드-온과 더 자세한 유/무료 플랜은 공식 페이지에서 확인하세요.
ClearDB 애드-온을 추가하고 나면 자동으로 인스턴스의 환경 변수에 CLEARDB_DATABASE_URL 변수가 추가되며,
이 변수에는 MySQL 데이터베이스 서버에 접속하기 위해 필요한 정보가 저장됩니다.
$ heroku config | grep CLEARDB_DATABASE_URL
CLEARDB_DATABASE_URL: mysql://b71a62cedaed57:[email protected]/heroku_3977850a05aa764?reconnect=true
$ mysql -u b71a62cedaed57 -h us-cdbr-iron-east-04.cleardb.net -p heroku_3977850a05aa764
Enter password:
Welcome to the MySQL monitor.  Commands end with ; or \g.
Your MySQL connection id is 174910210
Server version: 5.5.46-log MySQL Community Server (GPL)

Copyright (c) 2000, 2016, Oracle and/or its affiliates. All rights reserved.

Oracle is a registered trademark of Oracle Corporation and/or its
affiliates. Other names may be trademarks of their respective
owners.

Type 'help;' or '\h' for help. Type '\c' to clear the current input statement.

mysql> quit
Bye
$
원격 MySQL 서버에 잘 접속됨을 확인할 수 있습니다.
눈치 채셨겠지만 이 경우 비밀번호는 8b972fbd입니다? :-)
"뭐야! MySQL 서버를 원격으로 접속해?"란 생각이 들 수도 있겠지만,
보안과 같은 복잡한 문제는 믿고 맡긴다는 점이 클라우드 서비스의 장점(아마도...?)이겠죠?
SSL 접속도 지원하므로 관련해서는 공식 문서를 참조하세요.
스키마 준비
간단한 데이터베이스 스키마를 준비합니다. 글을 저장할 수 있는 테이블을 구조는 다음과 같습니다.
CREATE TABLE `page` (
    `id`          INT UNSIGNED NOT NULL AUTO_INCREMENT,
    `title`       VARCHAR(128) DEFAULT NULL,
    `content`     TEXT         DEFAULT NULL,
    `create_at`   DATETIME DEFAULT NULL,
    `update_at`   DATETIME DEFAULT NULL,
    PRIMARY KEY (`id`)
) ENGINE=InnoDB DEFAULT CHARSET=utf8;
SQL 파일로 저장한 스키마를 이용해 ClearDB를 초기화합니다.
$ cat init.sql | mysql -u b71a62cedaed57 -h us-cdbr-iron-east-04.cleardb.net -p heroku_3977850a05aa764
Enter password:
$
의존 모듈 설정
테스트를 위해 개발 장비에 필요한 모듈을 설치한 것과는 별개로
Heroku 인스턴스에는 모듈을 설치한 적이 없으므로 의존 모듈 설정을 해주어야 합니다.
cpanfile을 다음과 같이 설정합니다.
requires "DBD::mysql"  => "4.041";
requires "DBIx::Lite"  => "0.29";
requires "Mojolicious" => "7.14";
웹 응용 구현
우선 데이터베이스와 웹 응용을 연동해야겠죠.
테스트용으로 만든 간단한 Mojolicious 웹 응용으로 기존 app.pl을 대체합니다.
$ cd ~/workspace/heroku/keedi-seoulpm
$ wget -q -O- http://advent.perl.kr/2016/2016-12-21-app.pl > app.pl
app.pl 소스 코드 내의 데이터베이스 접속 부분을 자신의 Heroku 설정에 맞게 적절하게 조정합니다.
편의를 위해 데이터베이스 접속 정보를 코드에 포함했지만
실제로는 설정 파일을 이용하는 것을 추천합니다.
...
my $database = "heroku_3977850a05aa764";
my $hostname = "us-cdbr-iron-east-04.cleardb.net";
my $port     = 3306;
my $user     = "b71a62cedaed57";
my $password = "8b972fbd";
...
웹 응용은 크게 다음 네 부분으로 구성되어있습니다.
- 페이지 생성
- 페이지 열람
- 페이지 삭제
- 페이지 목록
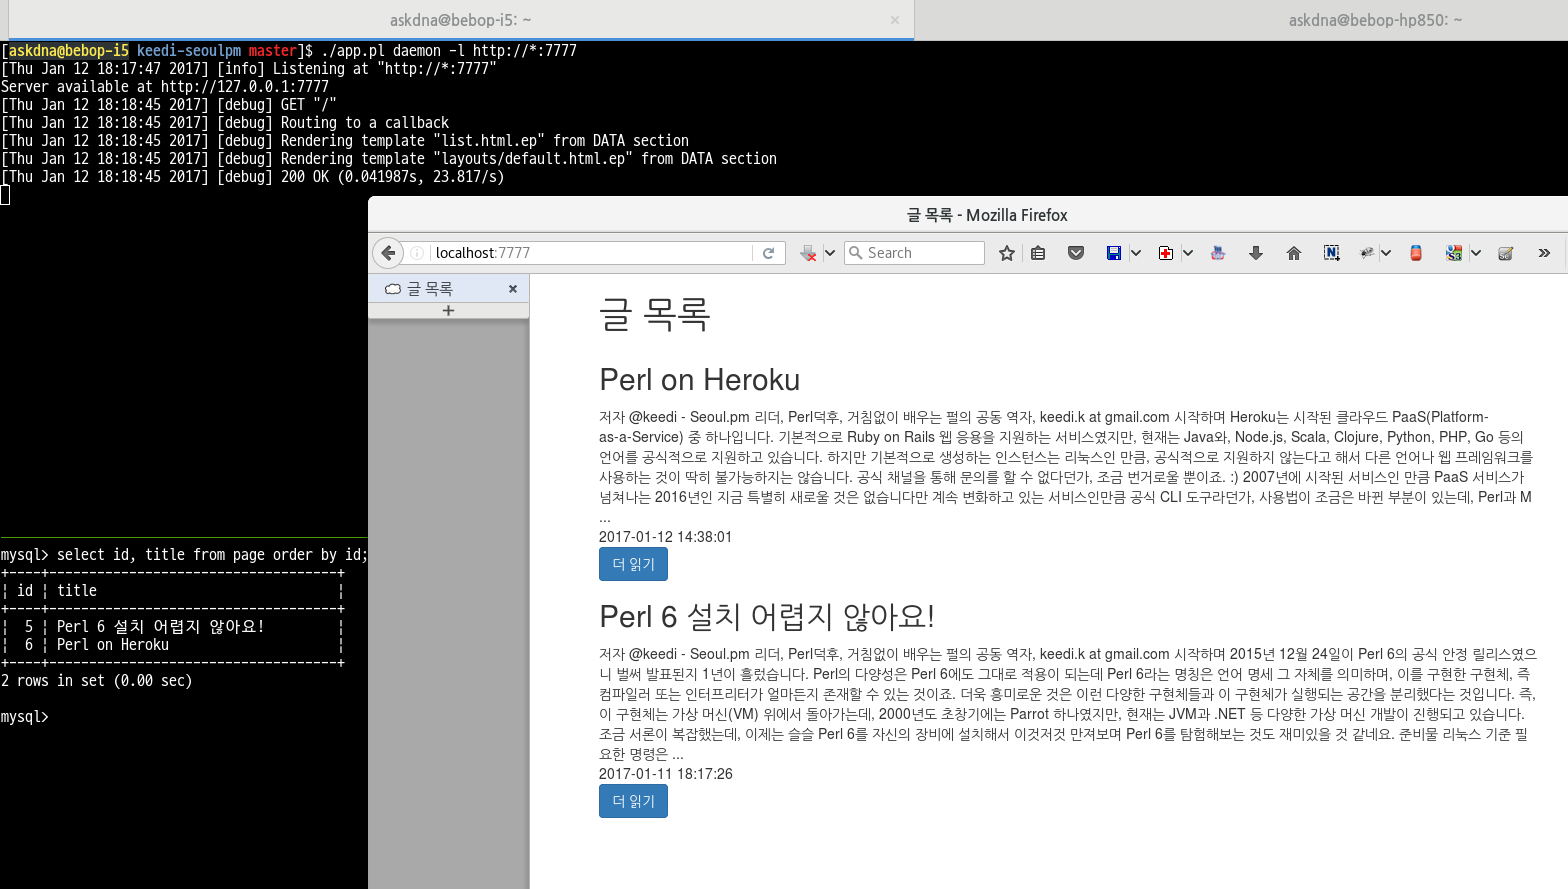
지난 기사인 넷째 날: 진짜 쉬운 위지위그 에디터: summernote를 참고해 Bootstrap 기반의 summernote 편집기를 활용한 부분과 꾸미기 위한 CSS를 제외하면 전형적인 웹 응용의 모양새를 가집니다. 로컬에서 테스트를 위해 구동한 모습은 다음과 같습니다.
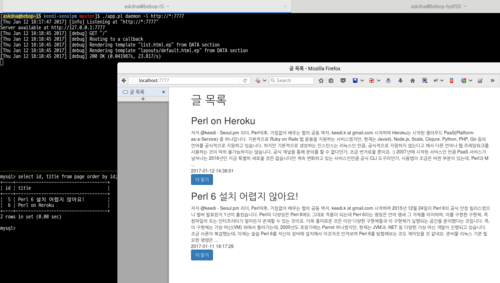 그림 1. 로컬에서 구동한 웹 응용 (원본)
Heroku로 발사!
여기까지 이상없이 따라왔다면 app.pl과 cpanfile이 변경되었을 것입니다.
우선 지역 저장소에 현재까지의 변경 사항을 저장하도록 하죠.
$ git st
 M app.pl
 M cpanfile
$ git add app.pl cpanfile
$ git commit -m "Perl on Heroku with MySQL"
[master 61b11f2] Perl on Heroku with MySQL
 2 files changed, 527 insertions(+), 27 deletions(-)
 rewrite app.pl (78%)
$
이제 Heroku에 배포하는 일만 남았네요. 원격 저장소에 지금까지의 변경 내역을 전송합니다.
$ git push heroku master
오브젝트 개수 세는 중: 4, 완료.
Delta compression using up to 4 threads.
오브젝트 압축하는 중: 100% (4/4), 완료.
오브젝트 쓰는 중: 100% (4/4), 9.95 KiB | 0 bytes/s, 완료.
Total 4 (delta 0), reused 0 (delta 0)
remote: Compressing source files... done.
remote: Building source:
remote:
remote: -----> Perloku app detected
remote: -----> Installing dependencies
remote:        cpanm options: --quiet --notest -l /tmp/build_d9e834d762c5a167d234af37fc2aa973/local
remote:        Successfully installed Clone-0.38
remote:        Successfully installed Class-Accessor-0.34
remote:        Successfully installed Class-Accessor-Chained-0.01
remote:        Successfully installed Sub-Uplevel-0.2600
remote:        Successfully installed Test-Exception-0.43
remote:        Successfully installed Data-Page-2.02
remote:        Successfully installed Sub-Identify-0.12
remote:        Successfully installed SUPER-1.20141117
remote:        Successfully installed Test-MockModule-0.11
remote:        Successfully installed DBI-1.636
remote:        Successfully installed DBIx-Connector-0.56
remote:        Successfully installed YAML-Tiny-1.69
remote:        Successfully installed Module-ScanDeps-1.23
remote:        Successfully installed File-Remove-1.57
remote:        Successfully installed Module-Install-1.17
remote:        Successfully installed Test-Warn-0.32
remote:        Successfully installed Hash-Merge-0.200
remote:        Successfully installed Sub-Quote-2.003001
remote:        Successfully installed Sub-Exporter-Progressive-0.001013
remote:        Successfully installed Devel-GlobalDestruction-0.14
remote:        Successfully installed Class-Method-Modifiers-2.12
remote:        Successfully installed Module-Runtime-0.014
remote:        Successfully installed Role-Tiny-2.000005
remote:        Successfully installed Moo-2.003000
remote:        Successfully installed Test-Deep-1.126
remote:        Successfully installed MRO-Compat-0.12
remote:        Successfully installed SQL-Abstract-1.81
remote:        Successfully installed XSLoader-0.24 (upgraded from 0.16)
remote:        Successfully installed Exporter-Tiny-0.042
remote:        Successfully installed List-MoreUtils-0.416
remote:        Successfully installed Dist-CheckConflicts-0.11
remote:        Successfully installed Try-Tiny-0.28
remote:        Successfully installed Module-Implementation-0.09
remote:        Successfully installed Package-Stash-XS-0.28
remote:        Successfully installed Package-Stash-0.37
remote:        Successfully installed Variable-Magic-0.60
remote:        Successfully installed B-Hooks-EndOfScope-0.21
remote:        Successfully installed namespace-clean-0.27
remote:        Successfully installed Test-Requires-0.10
remote:        Successfully installed Test-Fatal-0.014
remote:        Successfully installed Params-Validate-1.26
remote:        Successfully installed SQL-Abstract-More-1.28
remote:        Successfully installed DBIx-Lite-0.29
remote:        Successfully installed DBD-mysql-4.041
remote:        44 distributions installed
remote: -----> Installing local::lib
remote:        local::lib is up to date. (2.000019)
remote: -----> Discovering process types
remote:        Procfile declares types     -> (none)
remote:        Default types for buildpack -> web
remote:
remote: -----> Compressing...
remote:        Done: 3.4M
remote: -----> Launching...
remote:        Released v9
remote:        https://keedi-seoulpm.herokuapp.com/ deployed to Heroku
remote:
remote: Verifying deploy.... done.
To https://git.heroku.com/keedi-seoulpm.git
   cdbb0c8..61b11f2  master -> master
$
웹 응용에서 사용하는 데이터베이스 의존 모듈이 자동으로 설치되고, 배포까지 완료되었음을 확인할 수 있습니다. 문제가 없다면 접속해서 로컬에서 구동하던 것과 동일하게 CRUD 웹 응용이 동작함을 확인할 수 있습니다.
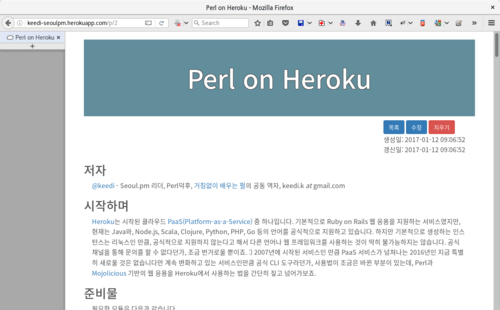 그림 2. Perl on Heroku with MySQL (원본)
정리하며
무료 플랜의 경우 용량이라던가, 트래픽 등 부족한 점은 있으나 개인적으로 사용한다면 용인은 가능한 수준입니다. 다만 물리적인 서버 위치로 대한민국을 지정할 수 없는 만큼 네트워크 지연이 큰 점은 치명적입니다. 유료 플랜이 결코 저렴하지는 않지만, 필요한 인력과 인프라가 구성되지 않은 회사 차원이라면, 효율적인 선택일 수도 있을 것 같네요. Heroku는 물론 대부분의 클라우드 서비스의 사용 방법은 대동소이하므로 이번 기사로 감만 잡는다면 다른 클라우드 서비스에서 Perl 관련 도구를 사용하는 것 역시 크게 어렵지 않을 것입니다. :-)
EOT
- 크리스마스 달력이란
- 펄 크리스마스 달력 #2010
- 펄 크리스마스 달력 #2011
- 펄 크리스마스 달력 #2012
- 펄 크리스마스 달력 #2013
- 펄 크리스마스 달력 #2014
- 펄 크리스마스 달력 #2015
- Perl Advent Calendar
- Perl 6 Advent Calendar
- Perl Catalyst Advent Calendar
- Perl Dancer Advent Calendar
- Future Advent Calendar
- 일본 Perl 입학식 Advent Calendar
- 일본 Perl 5 Advent Calendar
- 일본 Perl 6 Advent Calendar
- 일본 Mojolicious Advent Calendar
- Sysadmin Advent Calendar
- Web Design & Devlopment Advent Calendar
- 한국 루비 크리스마스 달력
- 이상한 모임 크리스마스 달력
- 펄.kr
- 네이버 펄 카페
- IRC #perl-kr 채팅
- 한국펄워크샵 2012


X-mas tree
& Llama
ASCII Art by ASCII Art Farts.
Computer ASCII Art by Chris.com.
Cup ASCII Art by ascii.co.uk.
Candle ASCII Art by heartnsoul.com.
Font ASCII Art by ASCII Art Farts.
Text ASCII Art by patorjk.com.
Artwork by
Inkyung Park
& Keedi Kim.
Designed by
Hojung Youn
& Keedi Kim.
Articles by
Seoul Perl Mongers.
Edited by
Keedi Kim.
Hosting sponsored by
SILEX.
Sponsored by
SILEX.
     .-'''  __  __
    /     \/  \/  \
    =-_-           |
        \. -____- / \
         //    /||  ''
        //|   //||
       == =  == ==